
Launch a website anywhere and in less than a minute using docker.
The Short Answer
Yes, this is the TL;DR right up front!
These are the steps to start a WordPress server using Docker with minimal effort:
- Install docker (see sidebar)
- Copy two files, docker-compose.yml and .env:
- Run a command:
docker-compose up -d
(Run this from the folder with those two files.)
That’s it! You are now running a website on your local machine at http://localhost!
If you want to better understand how this works, read on!
The Long Answer
Step 1: Install docker
Instructions are in the sidebar widget.
Step 2: Copy two files
The two files we copy are basically just instructions that docker will use to start your WordPress website.
The most current files can be found on GitHub here.
You can also clone the repo using git:git clone https://github.com/dawilk/coderevolve-docker-wordpress.git
docker-compose.yml
This is your docker-compose.yml file:
version: '2'

networks:
  wordpress-backend:
    external: false

services:
   wp-mysql:
     image: mysql:${TAG_MYSQL}
     container_name: ${WORDPRESS_DB_HOST}
     command: '--default-authentication-plugin=mysql_native_password'
     volumes:
       - ./mysql:/var/lib/mysql
     networks:
       - wordpress-backend
     restart: unless-stopped
     environment:
       MYSQL_ROOT_PASSWORD: ${WORDPRESS_DB_ROOT_PASSWORD}
       MYSQL_DATABASE: ${WORDPRESS_DB_NAME}
       MYSQL_USER: ${WORDPRESS_DB_USER}
       MYSQL_PASSWORD: ${WORDPRESS_DB_PASSWORD}

   wp:
     depends_on:
       - wp-mysql
     image: wordpress:${TAG_WORDPRESS}
     container_name: ${WORDPRESS_WEB_HOST}
     volumes:
       - ./html:/var/www/html
     networks:
       - wordpress-backend
     ports:
       - 80:80
     restart: unless-stopped
     environment:
       WORDPRESS_DB_HOST: ${WORDPRESS_DB_HOST}:3306
       WORDPRESS_DB_NAME: ${WORDPRESS_DB_NAME}
       WORDPRESS_DB_USER: ${WORDPRESS_DB_USER}
       WORDPRESS_DB_PASSWORD: ${WORDPRESS_DB_PASSWORD}
       WORDPRESS_CONFIG_EXTRA: "define('WP_HOME','${WP_HOME}'); define('WP_SITEURL','${WP_SITEURL}');"
This file is going to construct the two containerized applications that you need in order to run a WordPress site: the web application and the database.
Some explanation on the above yaml:
- networks | This is how you define docker networks for containers.
docker-compose will do this by default for all services if nothing is specified. We do it here because it sets the stage for setting up a reverse proxy the next post. - services | This is a collection of container implementations. What you call them here only matters in the context of docker-compose.
wp-mysqlandwpare the two services here. - image | The
<name>:<tag>selects the container image used for the service
<name>: the base image name from the docker hub (or image repo)
<tag>: the specific version of the image - container_name | [Optional] A way to name the container when it is started.
We need to name the mysql container because the web container needs to reference it with theWORDPRESS_DB_HOSTenvironment variable - command | This is what would be appended to a
docker runcommand to give further instructions to the application at startup.
Example:docker run mysql --default-authentication-plugin=mysql_native_password
We need the command above if we want to use TAG_MYSQL=8. This line could be removed or commented out if TAG_MYSQL=5.7 was used instead. Most WordPress sites have MySQL 5.7 behind them. - volumes | This is how we make the data persistent – by mapping
<host_path>:<container_path>. Without it, the docker container’s data would be destroyed when the container image is re-created or updated.
The host paths being used here place the important folders in the same directory with docker-compose.yml, making this folder the parent folder for everything about the WordPress site. - ports | This is how we bind host ports to container ports (
<host_port>:<container_port>)
You need the HTTP port 80 binding in order to access the WordPress site. - restart | This is the restart policy for the containers. This setting ensures that your site starts back up when your computer reboots.
Default isno. Other options arealwaysandon-failure - environment | These are the settings that really make the site work. It’s how we create the database, and how we connect the web application to it.
Important:WORDPRESS_CONFIG_EXTRAis an important piece to include if you want WordPress to be pre-configured with the domain name for a website. If you are launching this on a headless server, it’s very important to set this!
.env
This is your .env file:
TAG_MYSQL=8
TAG_WORDPRESS=latest
WORDPRESS_WEB_HOST=coderevolve-webhost
WORDPRESS_DB_HOST=wordpress-mysql
WORDPRESS_DB_ROOT_PASSWORD=S0meSuperS3cretP4ssword
WORDPRESS_DB_NAME=wordpress
WORDPRESS_DB_USER=wpuser
WORDPRESS_DB_PASSWORD=0therPa55w0rd
WP_HOME=http://localhost
WP_SITEURL=http://localhost
The .env file is an optional file that docker-compose can use with the YAML file. It provides environment variables (thus the .env name) that will replace contents wrapped with ${} in the docker-compose.yml file.
You should edit this file. Change the passwords at the very least!
You can use docker-compose without this file, but it makes life easier because it contains all the variables that you’re likely to change, and some of them get used more than once in the docker-compose.yml file.
Step 3: Run a command
Open a terminal in the directory where you put the docker-compose.yml and .env files, and run this command: docker-compose up -d
This is the shortest way to tell the docker engine to run multiple containers at the same time.
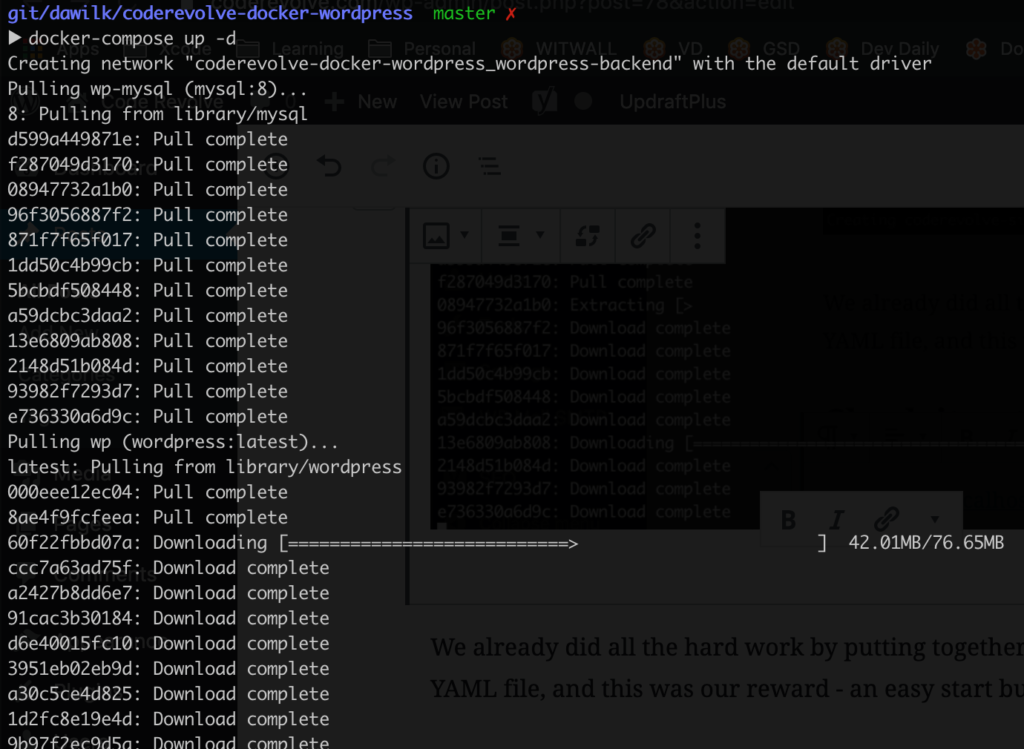
We already did all the hard work by putting together the instructions in the YAML file, and this was our reward – an easy start button!
Check it out!
Go to http://localhost and see your site for yourself!
Note: it can take a minute or two to start for the first time because docker will first download the wordpress and mysql images, and then configure the containers and volumes (html and mysql directories) during the first startup.
Cleanup
If you want stop the website, open a terminal in the folder with docker-compose.yml, and run this command: docker-compose down
This will stop and remove the containers (but not the WordPress data). You can run the up command again to bring it back online.
Once you’re done, or if you want to reset the website back to the beginning, delete the html and mysql folders in this directory.
Conclusion
While this guide is written such that you can launch a WordPress site on your local computer, the steps taken here can also be used to launch your own website as a cloud solution.
Apply these same steps on a micro EC2 instance in AWS, and you have a self-managed, cloud-hosted website for less than $10/month!
Just be sure to set up a WordPress plugin to take regular backups!
This guide is part of the series that helps you launch Docker containers as effortlessly as possible. Check out the other pages for more projects!
Use the Reverse Proxy guide to enable traffic encryption and SSL termination on your new WordPress site!